
Sunday has come and Tubs has hit the gym again. It's early morning and while I'm usually still asleep at this time, I'm expected to cook lunch today -Thai Fish Cakes. Unlike most people, it's essential that I get off to an early start as my process in cooking tends to be unusually...slow. I chose to do fish cakes due to it's simplicity, not only because I'm a Level 1 cook (indeed a very poor cook), but also because it's [I assumed it would be] quite tasty. I adapted this from several different recipes to create my own version.
Thai Fish Cakes
Yield: 4 servings
Ingredients:
500g fish paste
2 tbsp red curry paste
¼ cup (60ml) coconut milk
1 medium sized corn, grain removed from cob
1 clove garlic crushed
1 tbsp fish sauce
½ tsp salt
1 tbsp cornstarch
breadcrumbs or panko (Japanese breadcrumbs), to coat
2 green onions, finely chopped
Chilli Sauce:
5 tbsp water
3 tbsp white vinegar
7 tbsp sweet chilli sauce
4 tbsp finely chopped unsalted roasted peanuts
7 tsp soy sauce
5 tsp sugar
To serve:
vermicelli noodles
salad
cucumbers
spring onion & shallot oil
coriander
Method:
1. In a bowl, combine the fish, curry paste, coconut milk, corn, green onions, garlic, fish sauce, salt, and cornstarch. Mix well.
2. Moisten your hands with water and divide the mixture into balls. Flatten each ball into a patty about 5 cm in diameter and 12 mm thick.
3. Spread out the breadcrumbs on a plate or cutting board and gently press the fish patties into the breadcrumbs to coat lightly.
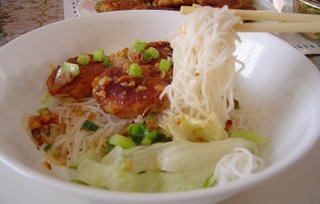
4. Preheat a frying pan over medium-high heat and then shallow-fry the patties until golden brown and cooked through. Using a slotted spatula or tongs, transfer to absorbent paper to drain. Serve with vermicelli noodles, lettuce, cucumber slices, coriander, shallot oil and chilli sauce.
Chilli Sauce:
Combine all the ingredients in a small pan, stir over heat until sugar is dissolved.
After our nod-of-the-head lunch (mum said it was ok, dad said it was nice, we thought it was pretty damn good for something that came from us), Tubs and I moved on to Chinese Egg tarts. Now I made this before with my cousin but it was terrible...a dismal attempt. How we moaned and groaned over our splatter of crust and egg custard; but that's another story. Today Tubs and I made another attempt -it tasted quite nice although appearance-wise, it wasn't exactly something to boast about. Perhaps this has something to do with our lack of patience and laziness...instead of making our own pastry/dough, we used frozen puff pastry. In any case, it was a new and improved version compared to the previous disaster, and for this I have to thank Chop from http://www.xanga.com/CantoneseCooking.
Here's her recipe below (I made some slight changes...very slight).
And keep in mind, though I'm not sure if it's just us, but it's important to prick the pastry many times NOT ONLY ON THE BOTTOM but also on the sides.

Before it was left to bake in the oven for the 2nd time...
Chinese Egg Tarts
Short-cut Crust:
Buy a sheet of frozen puff pastry and cut rounds into it (size depends on your muffin tins). Dock the dough (that means prick it with a fork), and press it into the lined muffin tin. You dock the dough so it doesn't get too puffed while baking. Bake for about 6-8 minutes on 170C (or until a light golden color). Remove from oven. Increase oven temperature to 200C. Fill your tarts and bring back to the oven. The puff pastry will give you a slightly uneven, but flaky dough.
Filling:
2/3 cup white sugar (I added a little more than this)
1 1/2 cups water
8 eggs, beaten
1 1/2 tsp vanilla extract
1 cup milk
Method:
Preheat oven to 200C.
1. In a saucepan, add sugar and water and cook over low heat until sugar dissolves. Remove from heat and cool to room temperature. (Sugar mixture MUST be chilled before mixing in eggs!!)
2. Beat eggs in large bowl and slowly pour in sugar syrup while stirring continously. Mix in vanilla extract and milk.
3. Strain the egg mixture through a sieve, and fill the tart shells. You don't have to strain it, but if you don't, you will not have a silky smooth texture.
To be honest, I simply mixed all the above ingredients together and used an electronic mixer hmm...

Not quite a looker I know...but it tastes good! =)

Mmm...close up tarties...mmm...
Thai Fish Cakes

Yield: 4 servings
Ingredients:
500g fish paste
2 tbsp red curry paste
¼ cup (60ml) coconut milk
1 medium sized corn, grain removed from cob
1 clove garlic crushed
1 tbsp fish sauce
½ tsp salt
1 tbsp cornstarch
breadcrumbs or panko (Japanese breadcrumbs), to coat
2 green onions, finely chopped
Chilli Sauce:
5 tbsp water
3 tbsp white vinegar
7 tbsp sweet chilli sauce
4 tbsp finely chopped unsalted roasted peanuts
7 tsp soy sauce
5 tsp sugar
To serve:
vermicelli noodles
salad
cucumbers
spring onion & shallot oil
coriander
Method:
1. In a bowl, combine the fish, curry paste, coconut milk, corn, green onions, garlic, fish sauce, salt, and cornstarch. Mix well.
2. Moisten your hands with water and divide the mixture into balls. Flatten each ball into a patty about 5 cm in diameter and 12 mm thick.
3. Spread out the breadcrumbs on a plate or cutting board and gently press the fish patties into the breadcrumbs to coat lightly.
4. Preheat a frying pan over medium-high heat and then shallow-fry the patties until golden brown and cooked through. Using a slotted spatula or tongs, transfer to absorbent paper to drain. Serve with vermicelli noodles, lettuce, cucumber slices, coriander, shallot oil and chilli sauce.
Chilli Sauce:
Combine all the ingredients in a small pan, stir over heat until sugar is dissolved.
After our nod-of-the-head lunch (mum said it was ok, dad said it was nice, we thought it was pretty damn good for something that came from us), Tubs and I moved on to Chinese Egg tarts. Now I made this before with my cousin but it was terrible...a dismal attempt. How we moaned and groaned over our splatter of crust and egg custard; but that's another story. Today Tubs and I made another attempt -it tasted quite nice although appearance-wise, it wasn't exactly something to boast about. Perhaps this has something to do with our lack of patience and laziness...instead of making our own pastry/dough, we used frozen puff pastry. In any case, it was a new and improved version compared to the previous disaster, and for this I have to thank Chop from http://www.xanga.com/CantoneseCooking.
Here's her recipe below (I made some slight changes...very slight).
And keep in mind, though I'm not sure if it's just us, but it's important to prick the pastry many times NOT ONLY ON THE BOTTOM but also on the sides.
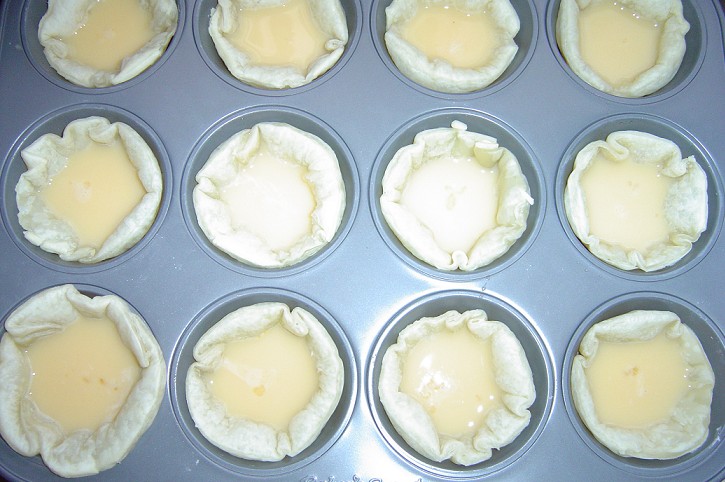
Before it was left to bake in the oven for the 2nd time...
Chinese Egg Tarts
Short-cut Crust:
Buy a sheet of frozen puff pastry and cut rounds into it (size depends on your muffin tins). Dock the dough (that means prick it with a fork), and press it into the lined muffin tin. You dock the dough so it doesn't get too puffed while baking. Bake for about 6-8 minutes on 170C (or until a light golden color). Remove from oven. Increase oven temperature to 200C. Fill your tarts and bring back to the oven. The puff pastry will give you a slightly uneven, but flaky dough.
Filling:
2/3 cup white sugar (I added a little more than this)
1 1/2 cups water
8 eggs, beaten
1 1/2 tsp vanilla extract
1 cup milk
Method:
Preheat oven to 200C.
1. In a saucepan, add sugar and water and cook over low heat until sugar dissolves. Remove from heat and cool to room temperature. (Sugar mixture MUST be chilled before mixing in eggs!!)
2. Beat eggs in large bowl and slowly pour in sugar syrup while stirring continously. Mix in vanilla extract and milk.
3. Strain the egg mixture through a sieve, and fill the tart shells. You don't have to strain it, but if you don't, you will not have a silky smooth texture.
To be honest, I simply mixed all the above ingredients together and used an electronic mixer hmm...

Not quite a looker I know...but it tastes good! =)

Mmm...close up tarties...mmm...
3 comments:
Helen (AugustusGloop)- Hi!So glad to see you here, thanks for reading! =)I'm not much of a cook but am trying and really do love food. Might start to have some Sydney restaurant reviews too =)
prada - Hi! You've never had Chinese tarts? You're missing out (not the ones I made, the ones at yum cha). Make it a must have on your food list =)
浜崎あゆみ - Hi! Thanks for reading!Thanks for the compliment =)
Post a Comment